English
 中文简体
中文简体 عربى
عربى


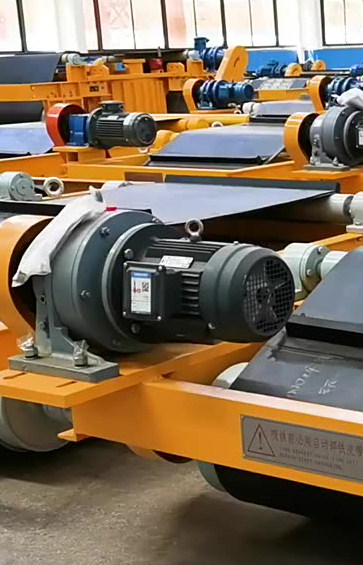
A maintenance engineer at a concrete block plant faced a recurring headache: the circuit breaker for a skip hoist’s brake kept tripping. The hoist carried tons of raw material, and every stoppage halted production . This scenario is a classic example of the frustrations captured in forum discussions: a Three Phase Brake Motor system that intermittently loses power, bringing critical machinery to a standstill. Whether it's a saw bench failing to start or a hoist losing holding power, a tripping breaker demands immediate and systematic troubleshooting .
The issue can be significantly more complex than a simple overload. The root cause may lie in the main motor windings, the power supply, the control circuit, or the specific components of the brake assembly itself. Unlike a standard Three Phase Brake Motor, the integrated brake adds another layer of potential faults, from coil failure to rectifier problems. A systematic approach, starting with safety and moving through visual and electrical checks, is essential to accurately diagnose the problem and prevent unnecessary component replacement.
Step 1: Safety primary and Initial Observation
Before any testing, safety is paramount. Proper lockout/tagout procedures must be followed to ensure the equipment is completely de-energized . Once safe, gather initial clues from the behavior of the trip.
When Does It Trip? Note if the breaker trips instantly when attempting to start, after a few seconds of running, or only when the brake engages or disengages.
Instant trip: Often indicates a short circuit in the motor windings, brake coil, or supply cabling .
Delayed trip (a few seconds): Suggests an overload condition, such as a mechanical bind, single-phasing, or a brake that is not releasing fully .
Trip during stop/brake function: Points directly to an issue with the brake coil, its rectifier, or its control contactor.
Visual and Olfactory Check: Open the motor terminal box and the brake cover. Look for discolored insulation, loose connections, or signs of overheating. A burnt smell is a strong indicator of winding or coil failure .
Step 2: Isolate the Problem - Motor vs. Brake vs. Supply
To pinpoint the fault, you must isolate the major components. A method recommended by experienced technicians is to disconnect the motor from the supply at a junction box and then attempt to start the circuit .
Test A: Disconnect the Motor: If the breaker holds with the motor disconnected, the fault lies downstream—either in the motor itself or its connected brake.
Test B: Check the Supply: With the motor disconnected, measure the voltage between each phase (L1-L2. L2-L3. L3-L1) at the contactor. A significant voltage imbalance or missing phase points to a supply-side issue . A single-phasing condition, where one phase is lost, forces the remaining two phases to draw excessive current, which can eventually trip the breaker or, worse, burn out the motor if the overloads aren't sensitive enough .
Step 3: Test the Three Phase Brake Motor Windings
If the supply is healthy, the focus shifts to the Three Phase Brake Motor itself. Using a multimeter, perform these checks :
Winding Resistance Test: Measure the resistance between each pair of terminals (U-V, V-W, W-U). The readings should be balanced, typically within 5% of each other. A significant difference—like the case where one phase showed a different ohmic value than the others —indicates shorted turns or a bad connection in that winding.
Insulation Resistance Test: Using a megohmmeter (megger) rated for the motor's voltage, test the insulation between each winding terminal and the motor's ground/ frame. A reading below 1 megohm per 1.000 volts of motor rating suggests insulation breakdown and a ground fault, which will trip breakers instantly .
Step 4: The Brake System Deep Dive
If the main motor windings test good, the culprit is likely the brake assembly. The brake in a Three Phase Brake Motor typically consists of a coil, a rectifier (if it's a DC brake), an air gap, and a friction disc. All are potential sources of trouble.
Brake Coil Resistance: Just like the main windings, measure the resistance of the brake coil. In the hoist example, the engineer found one phase of the three-phase brake coil had a different resistance, confirming the coil was damaged .
The Air Gap Issue: The air gap between the coil and the armature plate is critical. Forum posts and field reports emphasize this as a common cause of coil failure .
Gap too wide: The coil draws excessive current in an attempt to create a magnetic field strong enough to pull in the armature, causing overheating and eventual burnout.
Gap too narrow: Prevents the friction disc from fully releasing, causing the brake to drag, overloading the motor, and potentially causing mechanical wear and thermal trips.
Rectifier Failure: If the brake is DC-operated, a failed rectifier can send pulsating DC or even AC to the coil. This can cause the coil to overheat, buzz loudly, and draw erratic current, causing breaker trips .
The Perils of Rewinding and Path to Resolution
Finding the root cause is only half the battle. As the concrete plant engineer discovered, a common field fix—rewinding a burnt brake coil—can be fraught with risk. The local winder could not replicate the original coil's specifications, causing repeated failures after only a few hours of operation . The magnetic field was not uniform, and the exact winding formula (star or delta) was lost. This story underscores a vital point: while rewinding a Three Phase Brake Motor or its brake coil might seem cost-effective, it often leads to chronic unreliability.